To change the thermal paste on a GPU, you take the cooler off the card, clean the old paste off the chip and the metal cold plate, put a fresh pea-sized dot of new paste on the chip, and bolt everything back together. The whole job takes about 45 minutes and costs under $15 in materials. On an older card that has started running hot, a fresh repaste often drops load temperatures by around 8°C.
It sounds scary the first time. It isn’t. If you can undo a few screws in the right order and keep track of some small parts, you can do this. The rest of this guide walks you through every step, plus the one part most quick guides skip: the thermal pads.
Should you even do it?
Not every GPU needs new paste. If your card is less than three years old and temperatures look normal, leave it alone. You won’t gain anything, and a bad application can make things worse.
A repaste is worth it when you have something to gain. The clearest sign is temperature creep: your card runs 10°C hotter under the same game than it did six months or a year ago, and nothing else changed. The case isn’t dusty, airflow is fine, the fans still spin. That leftover heat usually means the factory paste has dried out and stopped moving heat well.
Fresh compound is a semi-liquid that fills the microscopic gaps between the GPU chip and the metal cold plate. Heat crosses that contact instead of getting trapped. Over years of heating and cooling, the paste dries, cracks, and gets slowly squeezed out from the center of the chip, right where the most heat is. That’s when temps climb.
Quick rule: if your GPU is 3+ years old and runs noticeably hotter or louder than it used to, a repaste is almost always worth it. If it’s newer and cool, don’t bother.
The warranty warning
Opening your graphics card usually voids the warranty. Many cards have a sticker over a screw that tears when you remove the cooler. If your card is still under warranty and running hot, contact the maker first and let them handle it. Only repaste yourself once the warranty is gone or you’ve accepted losing it.
What you need
Gather everything before you start so you’re not hunting for a cotton swab with the card half apart. Here’s the short list:
- A good thermal paste. A small tube is plenty; you only use a tiny amount.
- 99% isopropyl alcohol. Higher purity dries fast and leaves no residue.
- Lint-free cloths or coffee filters, plus a few cotton swabs for tight corners.
- A Phillips screwdriver that fits the small screws snugly.
- A small bowl or magnetic tray to hold screws so none go missing.
- Replacement thermal pads (maybe). More on these below, they matter more than people think.
Work on a hard, well-lit table. If you have an anti-static wrist strap, wear it. If not, touch a bare metal part of your case now and then to ground yourself, and don’t do this on a thick carpet.
How to change the thermal paste, step by step
Power down the PC fully and unplug it at the wall. Then remove the graphics card from the motherboard: unclip the PCIe latch, undo the bracket screws at the back of the case, and lift the card straight out. Unplug any power cables from the card itself. Now you’re ready.
- Lay the card face-down. Put it on the table with the backplate facing up. Take a photo first, it’s a handy reference for putting cables and pads back exactly where they were.
- Remove the backplate and shroud screws. Undo the screws on the back of the card. There are often several sizes, so keep them in groups that match where they came from. Set the backplate aside.
- Unplug the fan cable. A thin cable connects the fan shroud to the board. Gently pull the connector, not the wires, so you don’t tear it.
- Separate the heatsink from the chip. Undo the four spring-loaded screws around the GPU core in an X pattern, a turn or two on each in turn, so pressure comes off evenly. Then lift the heatsink straight up. If it sticks, twist it very gently to break the old paste’s grip. Never pry with force.
- Clean off the old paste. Wipe the chip and the cold plate with a lint-free cloth dampened in isopropyl alcohol. Repeat until both surfaces are bare and shiny, with no chalky film left. Let them dry for a minute.
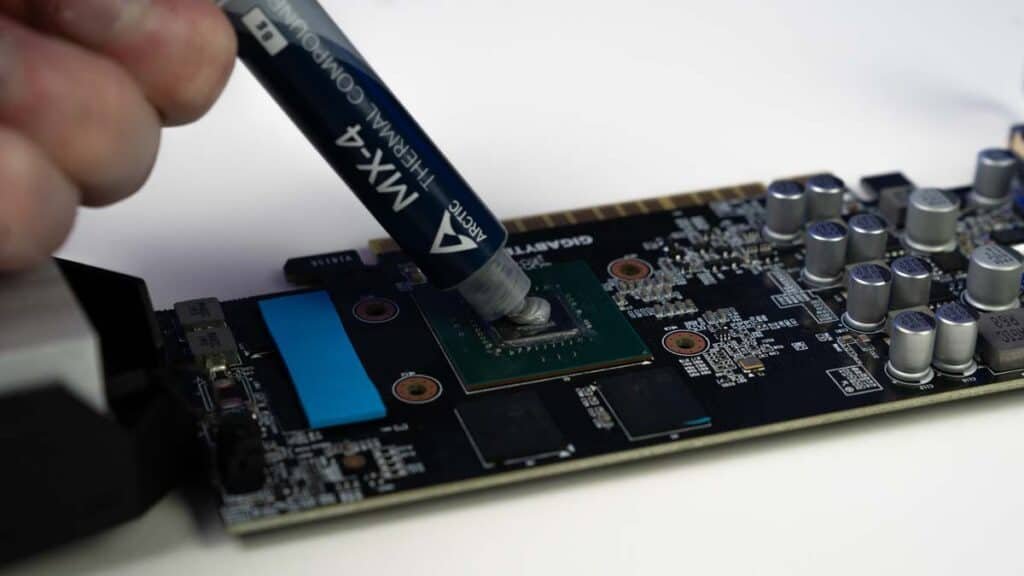
- Apply the new paste. Put a single pea-sized dot in the center of the chip. That’s it. Don’t spread it; the pressure of the heatsink will spread it evenly when you reattach.
- Reattach the heatsink. Lower it straight down onto the chip. Tighten the four core screws in the same X pattern, a little at a time, until snug. Even pressure is what gives you a clean, thin layer.
- Reassemble. Plug the fan cable back in, refit the shroud and backplate, and return each screw to its spot. Reinstall the card, reconnect its power cables, and close up the case.
Go slow on the core screws. The GPU chip is bare, with no metal lid to protect it like a CPU has. Uneven or over-tight mounting can chip a corner of the die. Snug and even beats tight.
For a photo walkthrough on a physical card, this iFixit graphics card repaste guide shows the same steps on real hardware, and the X-pattern screw method applies to almost any card.
Don’t forget the thermal pads
Here’s the part quick guides skip. The paste cools the main GPU chip, but flat rubbery pads cool the memory chips (VRAM) and power parts (VRM) around it. When you open the card, check those pads. If they’re squished flat, dried, or crumbling, replace them at the same time. Skipping this can leave your memory running hot even after a perfect repaste.
Pads come in set thicknesses: 0.5mm, 1.0mm, 1.5mm, and 2.0mm are the common ones. This is the step that trips people up. You must match the thickness of what you remove. A pad that’s too thin leaves an air gap; too thick and it holds the heatsink off the main chip. Measure or note the original thickness for each spot before you order replacements.
If your pads still look soft and springy and make good contact, you can leave them. They tend to last longer than paste because the parts they cool run cooler. But if you’ve already got the card open, swapping tired pads is cheap insurance.
A note on newer cards
Some recent high-end cards don’t use normal paste on the core at all. They use a phase-change material like Honeywell PTM7950, which ships as a solid pad and turns to paste once it heats up. It lasts a very long time, up to around 10 years, so if your card has it, you likely never need to touch the core. Only replace it if you’ve already separated the heatsink from the chip.
How much paste, and which method
Use about 0.1 ml, roughly a pea. The goal is a thin, even layer once the heatsink presses down. Too much and the layer gets thick, which actually slows heat transfer and can ooze out the sides. Too little and you leave air gaps that do the same thing. A single center dot is the most foolproof method for most cards, and letting the heatsink spread it avoids trapping air bubbles.
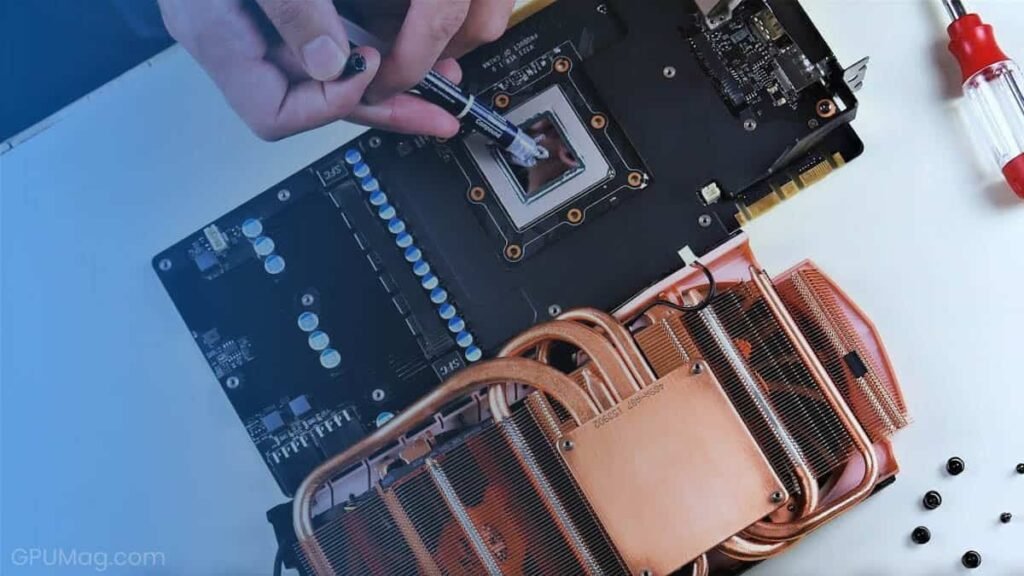
You may see people spread the paste by hand with a card, or use several small dots for a large chip. Those can work, but for a first repaste the single dot is the easiest way to get an even result without overthinking it.
After you reassemble: check your temps
Reconnect everything and boot the PC. Once you’re back in Windows, watch your temperatures under load to confirm the repaste worked. A free tool like TechPowerUp’s GPU-Z shows your core temperature, and on many cards the memory temperature too, in real time. Run a demanding game for 20 to 30 minutes, then check the peak readings. They should be lower than before.
One 2026 quirk: NVIDIA removed the hotspot (junction) sensor on RTX 50 series cards, so on a 5070, 5080, or 5090 you’ll only see core and memory temps. AMD’s RX 9000 cards still report junction temperature, which is handy for spotting a poorly mounted cooler.
How often should you repaste?
For most cards, every three to five years is plenty. If you push your GPU hard with long gaming or heavy compute work, aim closer to every two to three years. There’s no exact schedule; the honest answer is to watch your temperatures and repaste when they start climbing under the same workload, not on a fixed calendar.
Frequently asked questions
Does changing GPU thermal paste really lower temperatures?
Yes, on an older card with dried paste. A fresh repaste commonly drops load temps by around 8°C. On a newer card that’s still cool, expect little to no change, since the factory paste is still doing its job.
Will replacing the thermal paste void my GPU warranty?
Usually, yes. Most cards have a warranty sticker over a screw that tears when you open them. If your card is still covered and running hot, contact the maker first instead of opening it yourself.
Can I use CPU thermal paste on my GPU?
Yes. Standard (non-conductive) thermal paste works fine on both. Just avoid getting electrically conductive types like liquid metal near other components unless you know exactly what you’re doing, as spills can short parts out.
Do I need to replace the thermal pads too?
Only if they look flattened, dried, or crumbly. If they’re still soft and make good contact, leave them. If you do replace them, match the original thickness exactly, or you’ll create gaps that hurt cooling.
How much thermal paste should I use on a GPU?
About a pea-sized dot, roughly 0.1 ml, in the center of the chip. Let the heatsink spread it when you tighten it down. Too much or too little both make cooling worse, so don’t overdo it.
Conclusion
Changing GPU thermal paste comes down to a simple loop: take the cooler off, clean both surfaces with isopropyl alcohol, drop a pea-sized dot of fresh paste on the chip, and rebuild the card, tightening the core screws evenly in an X pattern. Check the VRAM and VRM pads while you’re in there. A good result is a card that runs several degrees cooler and quieter under load. Only do it once the warranty is gone and temps actually warrant it.
Related Post:
GPU Fan Speed: What’s Normal, How to Check It, and How to Take Control
Should You Perform Scaling on GPU or Display?
What Does Undervolting a GPU Do? A Plain Guide to Lower Temps and Power
How to Install a New GPU: A Safe, Step-by-Step Guide
What Does Ti Stand for in a GPU? Nvidia’s Titanium Cards Explained